Saturday, 4 January 2014

Configuring TCP/IP

This free lesson will teach you how to configure TCP/IP in windows and how to use the ipconfig command.
To configure TCP/IP click on Start.
Right-click on My Network Places.
Select Properties.
Configuring TCP/IP
Right-click on the connection you want to configure and select Properties.
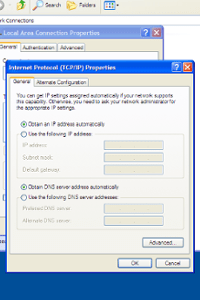
Highlight Internet Protocol (TCP/IP).
Select Properties.
This machine is currently configured to obtain an IP address automatically. Select Use the following IP address and fill out the relevant details.
Additional gateways and IP addresses can be added by clicking the Advanced Button…
..and configuring the appropriate options.

Using the ipconfig command

The ipconfig command can be used to display IP address information from a command prompt
Running ipconfig with /all switch produces a much more verbose display.

The IP Address

Every computer on a network and the internet needs an address. This address is known as an IP address. Two computers can never have the same address.  An IP Address is a group of 4 eight bit binary numbers represented in decimal. Each number is separated by a period, e.g. 10.1.0.1.  Any machines that are connected to a network will each need a unique address. Two machines cannot use the same address.
The IP address is divided into the network ID and the host ID. The network ID represents what network the machine is on. For two machines to communicate they have to be using the same network ID. The host ID represents a unique number assigned to the machine attached to the end of the network ID. For two machines to communicate they need to Have the same network address. They must, however have different host numbers.
A machine can identify which part of its IP address is the host ID and which part is the network ID by using a set of numbers called a subnet mask.

Subnet Masks

As well as an IP address every machine using TCP/IP needs a subnet mask.  The subnet mask splits the IP address into two parts, allowing the computer to identify which part is the network ID and which part is the host ID.
The subnet mask divides the IP address into two parts by using on (1) and off (0) switches. 1 represents a network ID and 0 represents a host ID.
A computer with an IP address of 10.1.0.1 and a subnet mask of 255.255.0.0 would have a network ID of 10.1 and a host ID of 0.1. This is worked out by converting both numbers into binary.
10            .1           .0.          1
00001010.00000001.00000000.00000001
255           .255.            0.               0
11111111.11111111.00000000.00000000
Using the subnet mask, divide the IP address up by using the 1’s to represent the network ID and the 0’s to represent the host ID.
00001010.00000001.00000000.00000001
11111111.11111111.00000000.00000000.
Using this, we can assume that the network ID is 00001010.00000001 (10.1) and the host ID is 00000000.00000001 (0.1).
A subnet mask doesn’t have to be a full octet. It is possible to use a subnet mask that is only a partial octet.
For example 255.255.240.0: This enables the administrator to create custom subnets to divide a private network into several discrete sub- networks

Bit Notation

An easier way of writing an IP address and its subnet mask is by using the form xxx.xxx.xxx.xxx/bits in the mask.  The address 10.1.0.1 with a subnet mask of 255.255.0.0 can also be written as 10.1.0.1/16.
This form of notation shows the number of Bits in the subnet mask, e.g. /8 represents 11111111.00000000.00000000.00000000 or 255.0.0.0.
/20 would represent 11111111.11111111.11110000.00000000 or 255.255.240.0.

IP Address Classes

When TCP/IP first appeared, IP addresses were placed into different classes A,B,C and D. The subnet mask of the machine would be determined by its IP address class.  To determine what class an IP address is , refer to the first octet of the address, e.g. 100 for 100.23.23.1
To determine what class an IP address is , refer to the first octet of the address, e.g. 100 for 100.23.23.1
Class    Subnet Mask                         Host ID’s
A       255.0.0.0                                   16,777,214
B       255.255.0.0                               65,534
C       255.255.255.0                           254
D       255.255.255.255 (Multicast)     N/A
The IP AddressOf the 32 bits available, the bits required for the network ID can’t be used. In a class B network for example this takes away 16 bits, leaving 16 bits for the host addresses. This can be used to make numbers up to 65536 (2 to the power 16). Host addresses using all 1’s or all 0’s are reserved for special use, hence the figure in the above table of 65534.
You have been assigned the address 134.34.0.0/20, how many hosts will you have?
/20 represents the subnet mask of 11111111.11111111.11110000.00000000 (255.255.240.0)
Therefore the Host ID is 0000.00000000, giving a total of 12 host ID’s to play with.
Therefore  (212)-2=4094. So there are 4092 different host ID’s
Why take off 2?
Two host ID addresses are reserved for every network.
If the host ID contains all 0’s it represents the Network it is on and can’t be used, e.g. 10.1.0.0/24 (00000000) is invalid. This is known as the Network Address.
If the host ID contains all 1’s then this represents every computer in the network. This is known as the Broadcast Address, e.g. 194.34.23.255/24 (11111111) represents every computer in the 194.34.23 network.
Reserved addresses:
If the host part of the address is all zeroes, this looks similar to the subnet mask and is called the Network Address. By convention, this address is not used for any host. If the host part of the address is all ones, this represents not a single host but all hosts on that network. It is termed the broadcast address, and it shouldn’t be used for any host.
Although these days you can have any subnet mask, classes are still used when a subnet mask isn’t given. There are  a number of private address ranges available for use in internal networks. These addresses will never be seen on the internet. As internet routers will not pass packets that originate from these addresses.
Class A : 10.0.0.0 – 10.255.255.255
Class B : 172.16.0.0 – 172.31.255.255
Class C : 192.168.0.0 – 192.168.255.255

Custom Subnet Masks

Imagine a scenario where you have been assigned the address range 193.28.34.0 for your company’s network. You need to have 14 separate networks each with ten computers in.
193.28.34.0 is a class C address which means you have 254 hosts but only the one network (the 193.28.34) network.
Considering that you only need 10 hosts and not 254 we can take some of the host ID’s and turn them into Network ID’s. You can do that by creating a custom subnet mask…
We have the 8 host digits to play with. This equates to (28)-2=254 addresses. However we only need 140. Some of the host ID’s can be used as network ID’s.

Routers

Routers are network devices that are used to connect separate networks and to enable network traffic to pass between the networks.  We have seen that machines on separate networks cannot pass data between themselves without assistance.  A router or default gateway passes data to addresses that are not on the senders network.
With the help of a router computers on both networks would be able to communicate. The router is physically connected to both networks and has two IP addresses.
When a client wants to send a packet out on the network it checks the network ID of the destination machine. If it is different from its own it would send the packet to its default gateway.
Routers can communicate with other routers so that network packets can be passed to their correct destinations.
A network packet travelling out on the internet may pass through several routers before reaching its target. Each router forwards the packet on to the next router until it either reaches or fails to reach its destination.

Binary Numbers

The thinking bits of a computer use “flip-flops” to show “up” or “down” or “ on” or “off”. It’s just as easy to think of these as on/off light bulbs. Arrays of these flip-flops are used for storing and manipulating numbers. The point is that they can only have two states like a light bulb. These two states can also be stores as N/S magnets on a hard disk, or pits in foil on CD, or high and low voltages in a cable etc. etc.

Computers similarly use groups of switches to represent numbers and perform calculations. These groups of switches are known as registers and show numbers in Binary form. Denary numbers (which we also call Decimal) use 10 symbols to represent numbers – 0123456789, whereas Binary needs just two symbols 01.
The number of digits in a binary number can be represented by a corresponding number of switches. In computer parlance, these are bits.
A bit is either a 1 or a 0. The different bits in a binary number represent different values which are used to create a number.
Binary Numbers
If the bit is switched on (1) then we use that bit. If the bit is switched off (0) then we ignore it. Add all the (1) switches together, 128+64+16+8+1, and you get the number 217. So the binary number for 217 is 11011001.

Binary Number Examples

11111010      128+64+32+16+8+2=250
00011010     16+8+2=26
11110000     128+64+32+16=240

Transmission Control Protocol/Internet Protocol (TCP/IP)

 in order for communication to occur on a network  all parties must use a common language. In IT networks this is known as a protocol.  There are many different protocols available for computer networks. The most common and widely used being TCP/IP.

TCP/IP is the standard protocol that is used on the internet. In order for any network to access the internet you must use the TCP/IP protocol suite. TCP/IP is required by Active Directory. For this reason, TCP/IP is the default protocol for Windows XP and 2003.

Protocols

Reference is often made to the TCP/IP stack. This consists of layers of mini applications which perform the discrete job of  sorting and filtering the data packets picked up by the NIC and then passing the packet on to the next layer for further processing. Eventually a coherent message pops out of the top of the stack into the operating system for the user to read. The reverse is also true i.e. converting of the reply into data packets that can be sent over the network media.
The layers in a TCP/IP stack write headers for network messages as well as decoding them.  Each level in the stack adds a portion to the network packet which its counterpart in the receiving computer will understand.  Strictly speaking, the NIC isn’t part of TCP/IP, but protocols are bound to a particular adapter.
At the receiving computer, the headers are stripped off as they pass up through the  TCP/IP stack until only the bare payload is presented to the user.

The DOD Four Layer Model

Transmission Control Protocol/Internet Protocol (TCP/IP)TCP/IP is often referred to as the TCP/IP protocol suite. TCP/IP is in fact a group of protocols/applications working together to provide network communication. TCP/IP was invented by the US Department of Defence (DOD) to allow machines to communicate over a network. It is a simpler model than the 7 layer OSI model.  The different components of TCP/IP all function at different layers. These layers group the different components into four different categories.

The Application Layer

The Application Layer contains the applications that use TCP/IP such as Internet Explorer and Outlook.  The Application Layer also contains Application Programming Interfaces (API) such as Winsock, which enables applications to use TCP/IP.

The Transport Layer

The Transport Layer is responsible for the transfer of data on the network.  There are two different transport protocols TCP and UDP. Both protocols provide transport but work in different ways.

Transmission Control Protocol (TCP)

TCP is a connection-orientated protocol. Both sides confirm that the data is being sent and received.

User Datagram Protocol (UDP)

UDP is a connectionless-orientated Protocol. Both computers presume the other side has received the data.  As an example, name resolution uses UDP. If the query fails then a TCP name query is made.

The Internet Layer

To send data the sender must have a method of distinguishing the recipient. This is called an IP address and they take the form of a unique number on the network . The Internet Protocol is responsible for these addresses.  The Internet Control Messaging Protocol (ICMP) is used to test connectivity between machines by sending ICMP messages using the PING command.  The Internet Group Messaging Protocol (IGMP) is used to send data to groups of machines, e.g. Streaming Video. This is known as Multicast.  The Address Resolution Protocol (ARP) is responsible for changing an IP address into the network card’s physical address. Every network card has a unique physical address hardwired into the card itself which is needed for communication on a network.

The Physical Layer

The Physical Layer is responsible for the actual physical media and how the data is sent to another machine, e.g. Fibre Optic, ATM.  There are many ways to send data down the cable, the most common technologies for LANs are Token Ring and Ethernet. In order for two machines to communicate they must be using the same technology or be connected via a bridge .


Tuesday, 26 November 2013

Configure

Security Overview

The object  of security is to protect data and it’s availability being compromised by malice or by accident.  In Windows there are two main strands to security – specific access permissions and authentication.  Specific permissions can be applied to users, groups, or resources.  Authentication confirms to the machine or network that a user has an account with permissions to log on.Individual servers and workstations need protection. As do the connections between them – especially if the connection is over the internet. In addition to making organisational precautions through software settings, attention should be given to the physical security of the system. The items illustrated can all be physically removed from a machine or indeed a building and therefore may require physical security.
A last theme of security is that of Auditing. This allows the administrator to view the history of who has attempted to access a resource and whether they succeeded.  Security can be set at the level of the individual machine or across a wider unit such as a domain. In each case the principles of securing the hardware, software and user access apply.

Security Considerations

Passwords are a principal device for restricting access to a machine or network. However, passwords can be guessed or stolen. To guard against theft or discovery, passwords should be changed frequently. Windows can enforce a password changing policy upon its users.  To counter guessing, quite simply, the passwords need to be made as long and as complex as is practicable.
A single letter password chosen from a…z might be guessed after 26 attempts. A two – letter password  has 26 times more possibilities (676). The following table shows this sequence of increasing complexity:
1 – 26 possibilities
2 – 676 possibilities
4 – 456976 possibilities
8 – 208827064576 possibilities
For passwords using a…z
Windows permits passwords of up to 127 characters, but recommends at least 7 for a password.
A single letter password chosen from a to z gives a base of 26 elements, but if the choice of elements includes upper-case letters and other symbols, thus the complexity level is increased significantly, and the password integrity is strengthened.  The length and the composition of a user’s password can be specified in a security policy, either for an individual machine or for a domain.  The lifetime of a password can also be set by this policy and the reuse of old passwords may also be prevented.
In summary, for a password to be strong and difficult to crack, it should:
  • Be at least seven characters long.
  • Be significantly different from your previous passwords.
  • Not contain your own name or user name. (Nor the name of spouse, children, pets etc.)
  • Not be a common word or name.
  • Have at least one symbol character in the second through sixth positions.
  • Contain Letters a-z, A-Z, Numerals 0, 1, 2, 3, 4, 5, 6, 7, 8, 9 and Symbols` ~ ! @ # $ % ^ & * ( ) _ + – = { } | [ ] \ : ” ; ‘ < > ? , . /
There are many facets of computer operation which need protection from unwarranted interference.
Files
Files need to be read by some users, modified by other users, backed up by yet other users, encrypted by owners and hidden from most! This is apart from needing to create files, delete files and share them across a network. Each of these is possible simultaneously in Windows because of the facility to set individual detailed permissions.
Granting Permissions
There is a permission for viewing and changing permissions on files and folders. When new resources are created, this permission needs to be configured carefully.
Domains And Sites
Permissions for access to larger units  such as  a domain are separate from those granted for local resources. Changes to one aren’t reflected in the other. For example if a user’s account is disabled for a local resource, the domain account may still be active.
Configuration
Settings for users or sites can be made so that such things as Control Panel and Administrative Tools are not available to a user or range of users. This is used to enhance security, but it can also be used to enforce corporate themes and identities across users’ desktops.
Installing Applications
The facility to install applications should not be distributed lightly. Non-standard, unsupported or defective applications can be a drain upon available technical support time, and interfere with multi-layer processes. This facility can be controlled quite closely with Windows.
Network Access
Rogue servers and users can attach themselves to a network, pretending to be something they’re not and gain access to private data. Long cable runs and internet links are weak points for the monitoring of traffic – hence a need for encryption.

Kerberos v5

Kerberos V5 is the primary security protocol for authentication within a domain. (Windows can use others such as SSL, TLS & NTLM.) The Kerberos V5 protocol verifies both the identity of the user to the network services and the service to the user. This form of verification is known as mutual authentication. Kerberos is named after the legendary 3-headed hound which guarded the gateway to Hades, the ancient Greek version of Hell.
The Kerberos V5 authentication mechanism issues tickets for accessing network services. These tickets contain encrypted data, including a users encrypted password and unique SID  that confirms the user’s identity to the requested service. Except for possibly entering an additional password or smart card credentials, the entire authentication process is invisible to the user.  Kerberos v5 authentication is automatically enabled when you install Windows 2000/XP and Server 2003.  For Kerberos to work, both the client and the machine the resource resides upon must be running Windows 2000 or later.
Tickets that are successfully Authenticated against the records in Active Directory grants the user access to the various resources in the domain for which he has permission without him having to identify himself with a user name and password each time.  All this is invisible to the user and also largely, to the administrator. However, it is useful to be able to understand the authentication procedure Kerberos uses.

NTLM Authentication

Pre-Windows 2000 clients use a protocol called NTLM (NT LAN Manager) to authenticate on the network. For backward compatibility Windows Server 2003 continues to support NTLM authentication.  NTLM uses less secure authentication and is not as preferable as Kerberos however for NT 4.0 and Windows 9x/Me it is the only available authentication protocol.

Configure

Local Policies are set through the Local Security Policy MMC. This can be easily accessed from the Administrative Tools folder from the Start Menu.
Expand Account policies…
..then Password Policy…
Local Security PoliciesEach of these options adds to the burden on the user logging in, but increases the security accordingly.
Password history can be set to prevent a user reusing the same set of passwords over and over, as these might be inadvertently disclosed or guessed. Up to 24 passwords can be remembered,
Passwords need to be changed regularly. How frequently they should change is determined by  these two settings. The maximum settings makes a user refresh a password after a set period of time, whilst the minimum age prevents a user changing his password too often.
The maximum value for both settings is 999 days.
A longer password is harder to crack. Therefore a user can be required to use a password of a minimum length.  7 characters is recommended for most networks. Up to 14 characters is the most that can be required by the security policy. A machine will accept a password of 127 characters
Although secure, very long passwords are a nuisance as users tend to forget passwords and assigning a very long password requiring varied characters is making a rod for your own back as you will have to reset them. For less critical data and functions, simpler passwords can be acceptable.
Password complexity rules prevent a user using, for example, a long string of zeroes or their name as a password.
Once enabled, an administrator might be warned that a new password doesn’t meet complexity rules, but it wouldn’t tell him what these are. Strangely, a user required to change a password at next login IS informed what the complexity rules are. ( See “Security Considerations”.)
The complexity rules are fixed in unless the Microsoft Software Development kit is installed. The Default rules are as follows.

Password Complexity Rules

Passwords must be at least 6 characters (regardless of minimum lengths set in security policy).  Passwords must contain characters from three of the following groups: capitals, lowercase letters, numerals, punctuation symbols.  Passwords must not include a login name, or any of a user’s real names.
Jo, JSmith, js1234, do not meet complexity rules
Joh?#n, JS2ith, Js1234, meet complexity rules
Connection to non-Windows machines requires CHAP authentication. For this, passwords are stored in an encrypted form so they can be more safely passed over a network.
To set one of these policies, right-click on it and choose Properties.
Set the number of characters required. 7 is recommended by Microsoft for most purposes. A user is free to use more.
Click OK to complete this.
The policy is now configured.

Account Policies

Malicious (or capricious) persons may occasionally attempt to guess at passwords, especially those for the administrator account. It is possible to deter this practice by locking out further attempts for a period of time.
If the Account Lockout Policy object is expanded, the pane of options is revealed.
Lockout Duration determines how long attempts at login are ignored after a specific number of failed logons. This can be anywhere between 1 and 99999 minutes (over two months) The 0 minute option locks the machine until an administrator unlocks it.
Lockout threshold determines how many wrong attempts at login are allowed before lockout. Up to 999 attempts can be allowed.  A figure of zero permits unlimited guesses at the login name and password.
The Reset Counter has its function in the following sort of scenario: A user mistypes her password a couple of times and, to avoid the inconvenience of being locked out for the next half hour, chooses to wait a shorter period of time before making another  hopefully correct attempt.
There is a logical connection between these three lockout policy settings, and a change in one has an implication for the others. By way of illustration, right-click on the Lockout Threshold item and select Properties.
Select a sensible figure for the number of invalid logon attempts, and see what happens when OK is clicked.
Whichever option is set, this dialogue box appears to suggest reasonable settings for the other two. Click OK to review all the settings which result.
The suggested selection of settings is usually entirely reasonable.

Local Policies

Expand Local Policies.
Expand Security Options.
These are some of the options that can be configured as part of a security policy.  Some, all or none of these options can be configured depending on your requirements.
For example If the security requirements of the local machine dictate that the last user’s name not be displayed in the logon screen then, Right click on this setting and select properties.
Enabling this setting is simply a matter of checking the radio button: …and clicking OK.
Now the security list has this setting listed as Enabled.

User Rights Assignment

User rights assignment determines which users or groups have logon or task privileges on the computer.  Using these is the best and most flexible way to secure a workstation, while still permitting access to a variety of users.  Remember that these can be set locally, but domain-wide settings can override these.
There’s a lot of them, and they each have their uses, depending upon the circumstances of the Company using the network.
For example users can be given Back up and restore rights by selecting this option.
Notice the default groups that have this privilege are the Administrators and Backup Operators group. Additional Users and Groups can easily be added from here by selecting the Add User or Group button.

Auditing and Audit Policies

Auditing allows you to log security related events on the local computer. These events can be anything from a user logging on, to a specific file being accessed.  Security events can be either audited for success or failure or both. You should only audit what is absolutely necessary as auditing can use up valuable disk space.
By default Windows Server 2003 has auditing already enabled. However a Windows XP or 2000 machine does not.  All auditing events are logged to the event viewer. The event viewer is covered in the Monitoring and Optimisation Module.
Selecting the Audit Policy folder reveals the options above.
The most common types of events that are audited apart from the default options are:
  1. Access to objects, such as files and folders
  2. Management of user and group accounts.
Account logon events relate to user accounts who are logging on to this computer over the network from another machine. This option is mainly used on Domain Controllers.
Every time a change is made to a user account an account management event is audited.
Directory Service is used to audit access to Active Directory Objects. Again, this is more useful on a Domain.
Auditing Logon events is a useful option because it allows you to log who is logging on to the local machine.
Object access can be used to audit access to resources on the local machine. As well as enabling it here the object will also need to be configured.
Policy Change audits will log anything relating to security policies being modified on the machine.
User’s who are using their privileges to perform tasks on the machines can be logged by enabling Audit privilege use.
Process tracking can be used to log which processes are running on the machine. This should be not be enabled unless absolutely necessary because of the large amount of entries it can create.
The Audit system events setting determines whether to audit when a user restarts or shuts down the computer or when an event occurs that affects either the system security or the security log.
Right-click on the item to be audited and select Properties.  (Alternatively, click on the Action button in the toolbar.)
Checking either or both of these boxes is all that’s required to enable auditing of logon events. Click OK to close this window.
confirm that auditing for this action has been enabled.
The event viewer contains a security log which shows audit events.
Double-click on an entry to view its contents.
This entry shows that someone attempted to login as an Administrator and failed to type the correct password. From here the date, time and the machine which was used to make the logon attempt can be seen.
Sometimes details need to be printed to a file. Clicking here copies the details to the clipboard.

Auditing Object Access

Auditing Object Access allows you to log when specific resources on the machine are accessed, e.g. A file. Auditing Object Access is a two stage process.  Object Access Auditing firstly needs to be enabled for either success, failure or success and failure and then the object needs to be configured.
Right-click on the object to be audited, e.g. a file on an NTFS partition.
Select the security tab and click Advanced.
Select the Auditing Tab.
Click on Add to add an audit entry.
Choose a user and click OK.
And then specify what you want auditing on the file.
If an attempt is made to delete this file by the user Ross Jackson an entry will be added to the security log.

Refreshing Policies

Security Policies aren’t immediately applied to the machine and often a restart is required. However a command line utility “gpupdate” can be used to refresh the computer’s security policy without a restart.  The command “gpupdate /target:computer” can be used to refresh the computer policy. The “gpupdate /target:user” policy is used when refreshing user group policy settings, which are covered later.

Configure

The MMC Console is called from START > RUN.
Add the group policy console from the Add/Remove Snap-ins Wizard.
Options here fall into two broad groups, namely settings for the machine as a whole, and settings for the users of the machine.
Software Settings is really only of use within a domain where programs are published or assigned.
Windows Settings is more relevant until the computer is joined to a domain.
This is a way to specify programs to run before the user begins to interact with Windows.
Double-click on the item to view its properties.
No script files have been selected, but one can be added now:
Browse to find a file in the Start-up folder.
One way to specify that all the scripts execute at the same time as far as possible is to use the Administrative Templates facility
expand System…
Then Scripts.
There is a bewildering array of options, here. Fortunately, there are explanations for each policy setting
Double-click on Run startup scripts asynchronously.
select the appropriate radio button.
The Explain tab gives a detailed explanation of the object’s function
The previous and next policy buttons allow the administrator to scroll through all the available policies until he finds one that fulfils his requirements
The quick scan facility is very useful in view of the enormous number of options available:
The best way to get familiar will all of these settings is to play around with them. Be careful not to lock yourself out of the machine.
There are as many options again for configuring users rights…
As can be seen from the panel on the left.
The foregoing configuration opportunities give an administrator a wide range of options for setting security. However, a basic list of essential security features might include disabling the following :
  • Command Prompt,
  • Control Panel,
  • MMC,
  • Installing programs from floppy, CD or DVD,
  • Shutdown,
  • Previous Login name,
  • Registry editing tools
(You might also consider configuring a Web Home Page.)
Group Policy is applied to the machine and all users of it – including the Administrator.  He can permanently remove his own control.